
The Short Version
If you designed in Canva and want us to print it, the best file to send is a high-resolution PDF downloaded with the Print preset and Crop marks and bleed switched on. Set your canvas to the exact size you want printed, add bleed in your design, and use real fonts rather than effects. The rest of this page walks you through the details.
Setting Up Your File in Canva — Before You Design
Start with the right size.
Don't use a Canva preset like "Instagram Post" if you're printing a 3.5" × 2" business card. Either pick a print template from the Print Shop (Business Card, Flyer, Poster, Brochure, Postcard, Letterhead, etc.) or click Custom size directly on the Canva home page and enter the exact final dimensions in inches.
Turn on the bleed guides.
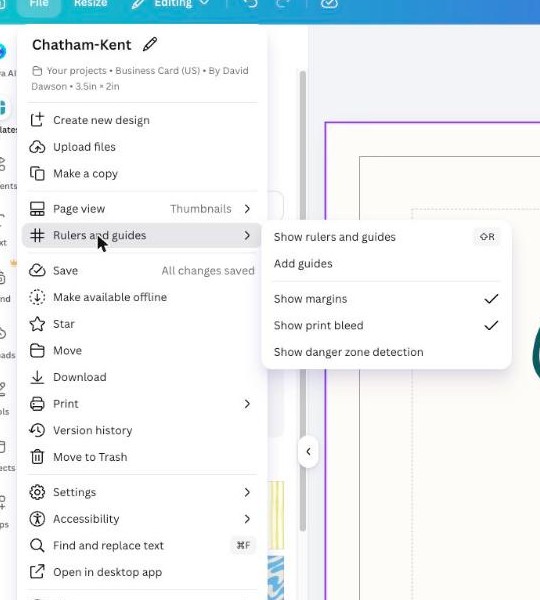
In the top-left of Canva, click File, then Rulers and guides, then Show print bleed. Canva expands your canvas slightly to show the bleed zone. The thin solid line just inside the edge is where your piece will be trimmed. Extend any background colour or image all the way to the outer edge of the canvas. That fills the bleed area and prevents white slivers after trimming.

Use the safety zone.
Keep important content (logos, text, key images) inside Canva’s margin guide. In the same menu (File, then Rulers and guides), turn on Show margins. A dashed line appears inside the trim line. Anything inside it is safe from trimming.
For an extra check, turn on Show danger zone detection in the same menu. Canva highlights the design in red if text or a logo gets too close to the edge.
Use real fonts and basic effects.
Canva has fun text effects (curve, neon, splice) — many of those don't translate well to print. Stick to standard fonts and basic styling for the cleanest results.
Use high-resolution images.
Canva will let you drop in a tiny phone photo and stretch it big — but it'll look pixelated when printed. Aim for images that are 300 dpi at the final printed size.
Stick to one or two fonts.
Easier to read, looks more professional, and avoids font-rendering issues.
How to Export From Canva for Print
- 1
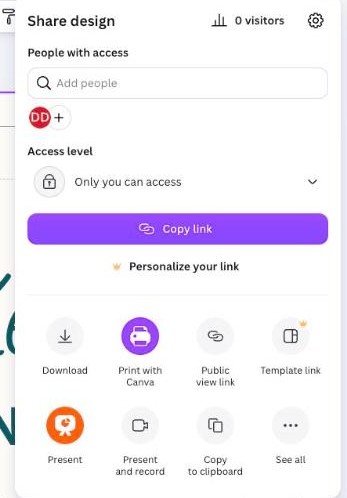
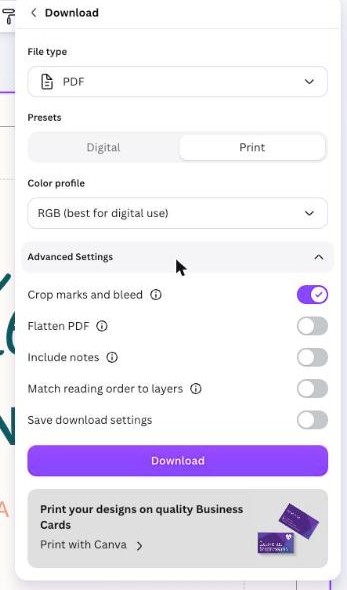
Click Share in the top right of the editor, then click Download.
- 2
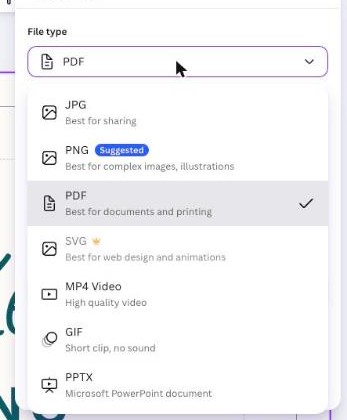
Under File type, choose PDF.
- 3
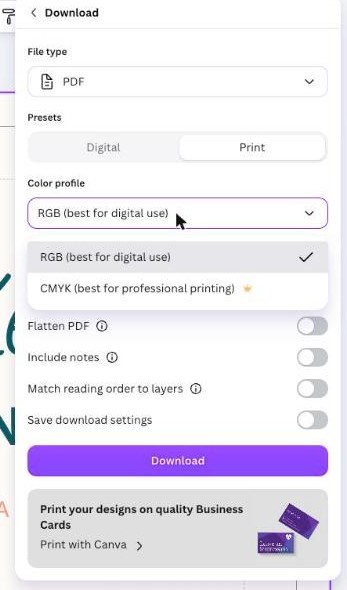
Under Presets, choose Print.
- 4
Under Colour profile, choose CMYK (best for professional printing) if you have Canva Pro. On a free account only RGB is available. That still works. We'll convert it on our end (colour may shift slightly).
- 5
Click Advanced Settings and make sure Crop marks and bleed is switched on. Don’t skip this one. Without bleed and crop marks, your file won’t trim cleanly.
- 6
Click Download.
- 7
Send us the downloaded PDF, not the Canva share link. We can’t print from a link.
Note: crop marks only appear in the downloaded PDF, not inside the Canva editor.
What We Can and Can't Use From Canva
We Can Use
- PDF Print downloads with bleed and crop marks
- High-resolution JPGs or PNGs (300 dpi at final size)
- Designs sized correctly to your finished print dimensions
- Standard fonts and clean layouts
Harder for Us to Use
- Shared Canva edit links (we can't print from a link)
- Low-resolution PNG or JPG exports
- Designs sized for screen (like 1080 × 1080 px) when you want a printed piece
- Designs with no bleed when you need print to go to the edge
- Fancy text effects that don't render properly in print
- Embedded videos, animations, or interactive elements
If you've already designed it without bleed or the wrong size, send it to us anyway — we'll let you know what (if anything) we can do to fix it.
Common Canva Issues We See — And How to Avoid Them
White slivers around the edge of your printed piece.
Cause
No bleed. Background colour stops right at the trim line.
Fix
Extend background colour 1/8" past the edge in your Canva design.
Text or logo getting cut off.
Cause
Important content placed too close to the edge.
Fix
Keep all important elements 1/8" inside the trim line.
Image looks blurry or pixelated.
Cause
Low-resolution image stretched too big.
Fix
Use higher-resolution images, or scale them smaller in the design.
Colours look different in print than on screen.
Cause
RGB to CMYK conversion (your screen and print use different colour systems).
Fix
Use Canva Pro's CMYK export if you have it. Or send us a printed sample to compare. We provide pleasing colour — exact Pantone matches aren't part of standard digital printing.
Wrong size when printed.
Cause
Designed in pixels or a Canva template that doesn't match the final print dimensions.
Fix
Set up your Canva canvas to the exact print size in inches before you start designing.
Red highlight on my design in Canva.
Cause
Text or a logo is too close to the edge.
Fix
Move it inside the dashed margin line. (File, Rulers and guides, Show danger zone detection.)